
Blog
Easy DIY Hemp Necklace: Step-By-Step Craft for All Ages
Creating a DIY hemp necklace is a fun and easy project for everyone, no matter the age. To get started, you’ll need some hemp twine, pick your favorite color, and scissors for cutting it to length. Optional beads can be added for flair while beeswax helps make knotting easier. First, measure around your neck to determine the desired length and cut two pieces of twine accordingly. As you follow the step-by-step instructions, remember to tie an initial knot before beginning the pattern of knots using phrases like “over, over, under, through.” Don’t forget to trim any excess cord at the end! Happy crafting!
Table of Contents
- Materials Needed for Your Hemp Necklace
- Step 1: Measure the Length of Hemp Twine
- Step 2: Prepare Additional Strands
- Step 3: Tie the Initial Knot
- Step 4: Start Knotting Techniques
- Step 5: Adding Beads for Flair
- Step 6: Continue Knotting to Desired Length
- Step 7: Finishing the Necklace
- Step 8: Trim Excess Cord
- Step 9: Final Adjustments and Tips
- Frequently Asked Questions
Materials Needed for Your Hemp Necklace
To get started on your hemp necklace, you’ll need a few basic materials. First, hemp twine is essential, and you can choose from a variety of colors to match your personal style; natural colors like tan are particularly popular. Next, make sure you have a pair of scissors that are sharp, as this will help you cut the twine cleanly and prevent any fraying. Adding some beads can really enhance your creation; think about using different sizes and shapes to create a unique look. If you’re looking to make knotting easier, consider using beeswax; it strengthens the twine and helps with the knots. Lastly, if you want a more polished finish to your necklace, a clasp can be a great addition; options like magnetic or lobster clasps are commonly used and can complement your design beautifully.
| Material | Description | Notes |
|---|---|---|
| Hemp Twine | Available in various colors, typically in natural tan. | Recommended thickness: about 1mm. |
| Scissors | For cutting the hemp twine to desired lengths. | Ensure they are sharp. |
| Beads (Optional) | Large hole beads or handmade beads for flair. | Consider mixing sizes and shapes. |
| Beeswax (Optional) | To coat the hemp for better knotting. | Helps strengthen the twine. |
| Clasp (Optional) | For a more finished look at the end of the necklace. | Magnetic or lobster clasps are common. |
Step 1: Measure the Length of Hemp Twine
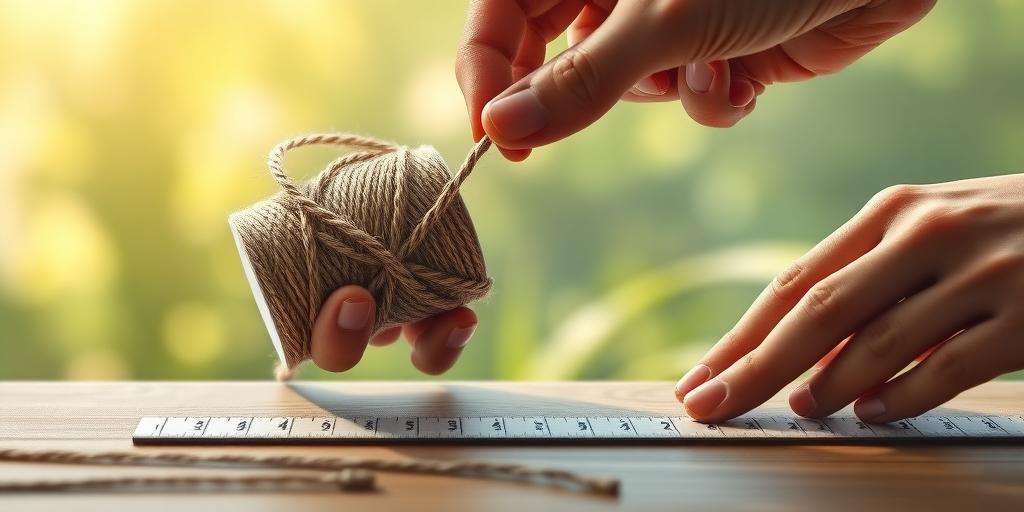
To begin crafting your hemp necklace, start by measuring the length of hemp twine you’ll need. Use a measuring tape to wrap around your neck, noting the size for a comfortable fit. A good average length for a necklace is about 22 inches, but make sure to add a few extra inches for knots and adjustments. This will ensure you have enough material to work with. It’s also wise to double-check your measurement to avoid cutting the twine too short. Consider whether you want your necklace to fit snugly or hang a bit looser, as this will influence how you measure. Taking the time to get this step right will help your necklace turn out beautifully.
Step 2: Prepare Additional Strands
To add texture and strength to your hemp necklace, cut two extra pieces of hemp twine. Each of these strands should be about four times the desired length of your necklace. For example, if your necklace is meant to be 22 inches long, cut the additional pieces to 176 inches. Once cut, fold each strand in half to create a natural loop, which will make knotting easier later on. Keeping your workspace organized is key to avoiding any tangles, so consider using a flat surface to lay everything out. Using a ruler or measuring tape helps ensure that all your pieces are consistent in length, which is important for a neat and professional-looking finish.
Step 3: Tie the Initial Knot
To begin your hemp necklace, tie the initial knot by folding the two pieces of hemp at one end, creating loops. This is where your design will start, so ensure that the loops are even for a balanced look. A simple overhand knot works perfectly as it serves as the anchor for your necklace. Make sure to secure the knots tightly to prevent them from coming undone during wear. Before you move on to the next step, double-check your knot to ensure it’s secure and ready for the next phase of your crafting.
Step 4: Start Knotting Techniques
Before diving in, it’s wise to practice your knotting technique on a scrap piece of hemp twine. This will give you a feel for the process without risking your main project. When you’re ready to begin, remember the knotting phrase: ‘over, over, under, through.’ This simple guide will help you create consistent knots. As you work, keep the two shorter strands straight down the center for a neater finish. To add some variety to your design, alternate the sides you start from with each knot. This can create different textures and patterns, making your necklace unique. Play around with various knots to see how they change the overall look of your piece.
- Practice your knotting technique on a scrap piece first.
- Different knots can create various textures and designs.
- Use the phrase ‘over, over, under, through’ for consistency in knots.
- Alternate sides for a different look in your knotting pattern.
- Keep the center strands straight for a neater finish.
- Experiment with color combinations for a personalized touch.
- Incorporate unique patterns to set your necklace apart.
Step 5: Adding Beads for Flair
To give your hemp necklace a personal touch, adding beads can elevate its look. Start by choosing beads that align with the overall theme of your necklace, whether it’s earthy, vibrant, or whimsical. Before securing your knots, string the beads onto the center strands of the hemp, allowing for a creative arrangement. Consider the spacing between the beads; too close can look cluttered, while too far can appear sparse. Mixing colors and shapes can create a fun, eclectic vibe, making each necklace unique. To ensure your beads stay in place, tie a secure knot underneath each bead, preventing any movement. This way, your design remains intact, and you can enjoy wearing your beautiful creation.
Step 6: Continue Knotting to Desired Length
As you continue knotting, periodically measure the necklace to ensure it reaches your desired length. This is an important step, as it helps you avoid any surprises later on. If you wish, you can also add more beads or decorative elements at this stage, which can enhance the overall design. Make sure each knot is tight and secure to prevent any slipping or loosening. You might want to experiment with different knotting techniques for some variety, such as alternating between flat and spiral patterns. Once you feel satisfied with the length and design, think about how you want to finish the necklace.
Step 7: Finishing the Necklace
To finish your hemp necklace, you have a couple of options based on your design preference. First, decide whether you want to tie off the ends or use a clasp. If you choose to tie off, make sure to create a secure overhand knot beneath the last knot you made. This will keep everything in place. On the other hand, using a clasp can give your necklace a polished and professional look. If you opt for a clasp, attach metal or wire cord tips to the ends of your hemp strands before fastening the clasp.
Before you call it done, double-check that all your knots are tight and there are no loose strands peeking out. This is also a great time to add an extra decorative knot at the end for flair, if you like. This little touch can make your necklace uniquely yours. Once you’re satisfied with the look, you can move on to trimming excess cord, ensuring everything is just right for wearing.
Step 8: Trim Excess Cord
Once you have completed your hemp necklace, it’s time to trim the excess cord. Make sure to leave a little extra length in case you want to make any adjustments later. Using sharp scissors is crucial here; they will help you avoid fraying the edges of the hemp. Aim to trim evenly for a clean finish. Be careful not to cut too close to the knots, as this might cause them to unravel. If you want to ensure that the ends stay secure, consider sealing them with a bit of glue. This step is important for maintaining the durability of your beautiful creation.
Step 9: Final Adjustments and Tips
Try on your necklace to check the fit and comfort. If it feels too tight or too loose, now is the time to adjust the length before you finalize everything. Ensure that all knots are tight and secure to avoid any mishaps while wearing your new creation. If you notice any frayed ends, consider using beeswax to keep them tidy and prevent further unraveling. A handy tip is to use a safety pin to hold the necklace in place while you make your final adjustments. This will help you visualize the fit without struggling to keep it in the right position.
Frequently Asked Questions
What materials do I need to make a DIY hemp necklace?
To make a DIY hemp necklace, you will need hemp cord, scissors, beads (if you want to add them), and optionally, glue for securing knots.
Is this project safe for children to do?
Yes, this project is safe for children, but adult supervision is recommended, especially when using scissors.
How long will it take to complete the necklace?
Making a hemp necklace generally takes about 30 minutes to an hour, depending on how detailed you want to get.
Can I customize my hemp necklace design?
Absolutely! You can customize the length, add different beads, or create unique knots to make your necklace special.
What if I mess up while making the necklace?
If you make a mistake, don’t worry. You can simply untie the knots and try again, or use the opportunity to be creative and change your design.
TL;DR Learn how to make a simple DIY hemp necklace with this easy step-by-step guide suitable for all ages. Gather materials like hemp twine, scissors, and optional beads or a clasp. Measure your desired length, prepare strands, and secure with knots. Add beads for style, continue knotting, and finish with trimming and adjustments. This enjoyable craft is perfect for kids and group activities.